| 1. Steel Security Door |
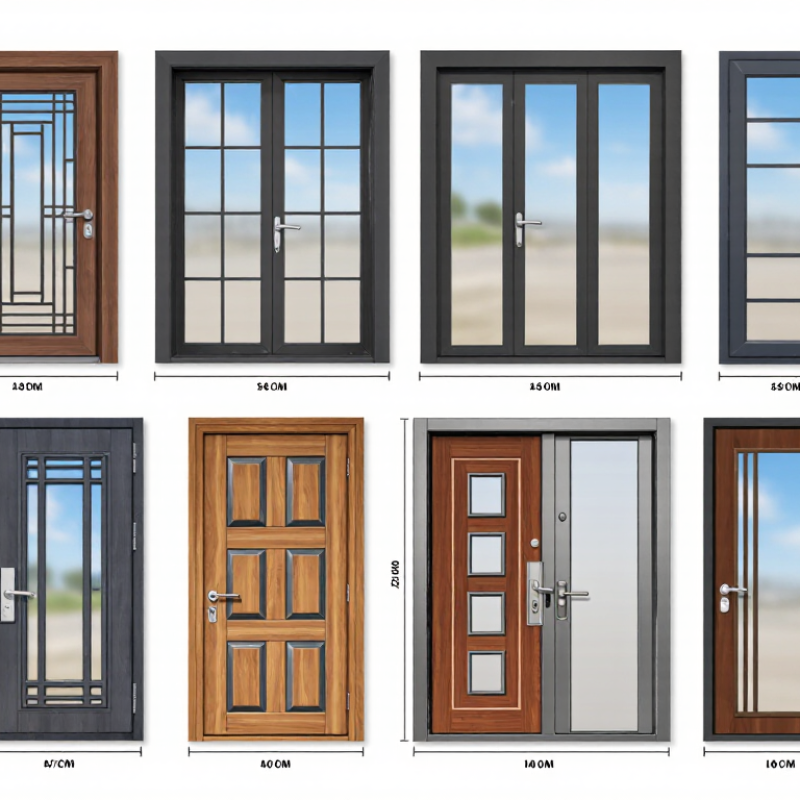
Steel door leaf and frame, commonly used as an apartment or house entrance door. The exact core, steel thickness, and locking system vary by model. |
- Measure the opening and check that the floor and jambs are reasonably level and plumb.
- Remove the old door and loose material; position the new frame in the opening.
- Use temporary wedges to set the frame plumb, level, and square.
- Fix the frame through its designated fixing points using anchors suitable for the wall construction.
- Hang the leaf, adjust the hinges, and test the lock and latch.
- Fill the perimeter gap with an appropriate material, then fit trim and sealant as specified.
|
Do not use expanding foam as the sole structural fixing. Confirm the anchor type and fixing locations against the door instructions and the wall material. |
| 2. Steel-Wood Composite Security Door |
A steel structural frame or door leaf with wood or wood-look decorative surfaces. The decorative finish may be vulnerable to scratches and moisture during fitting. |
- Check opening dimensions and protect the decorative faces before moving the door.
- Position and temporarily wedge the frame in the opening.
- Align the frame vertically and horizontally; check that its corners remain square.
- Install suitable mechanical anchors at the designated fixing points.
- Hang the leaf and adjust the hinges until the perimeter gaps are even.
- Test the lock, latch, and door swing; finish the frame-to-wall joint without covering moving parts.
|
Keep the finish dry and protected. Avoid forcing the frame into an out-of-square opening, which can cause binding or uneven gaps. |
| 3. Stainless-Steel Security Door |
Uses stainless-steel components or cladding. It is often selected for areas where corrosion resistance and easy cleaning are priorities. |
- Verify the opening, threshold height, and handing before installation.
- Set the frame in place and use non-staining shims to position it.
- Check plumb, level, and square before drilling or tightening anchors.
- Secure the frame with fixings suited to the substrate and the door design.
- Hang the leaf and check hinge movement, latch engagement, and clearances.
- Seal the perimeter joint with a compatible product and clean the surfaces with suitable materials.
|
Use compatible fixings and sealants to reduce the risk of staining or galvanic corrosion. Avoid abrasive tools that can damage the surface finish. |
| 4. Aluminum-Alloy Security Door |
Built with aluminum-alloy profiles and panels. Frame sections and fixing details differ from those of heavier steel doors. |
- Measure the opening and confirm the frame is the correct size and orientation.
- Place the frame into the opening and support it with shims at appropriate points.
- Check plumb, level, and squareness; ensure the sill or threshold is properly supported.
- Fix the frame using the specified fasteners and approved fixing points.
- Hang or assemble the door leaf as directed, then adjust the hinges and hardware.
- Test operation and apply compatible perimeter sealing materials.
|
Do not overtighten fixings or distort the frame. Confirm that the threshold is level and supported to prevent binding. |
| 5. Copper-Clad Security Door |
A security-door assembly with copper exterior panels or decorative copper elements. The structural frame and core may use other materials. |
- Inspect the opening and protect the copper finish during handling.
- Set the frame in the opening and shim it without twisting the frame.
- Check alignment and square before fixing the frame to the structure.
- Install the specified anchors and tighten them evenly.
- Hang the leaf and test the hinges, lock, and clearances.
- Complete the perimeter seal and remove protective coverings according to the finish instructions.
|
Use non-abrasive handling and cleaning methods. Copper appearance can change over time; follow the finish-care instructions supplied for the specific door. |
| 6. Cast-Aluminum Security Door |
Features cast-aluminum panels or decorative components, often with a substantial, ornamental appearance. The complete assembly may combine several materials. |
- Confirm the opening dimensions and plan safe handling for the door's weight.
- Position the frame with suitable lifting support and temporary shims.
- Check the frame for plumb, level, and square.
- Fix the frame to the wall using the designated anchors and fixing points.
- Hang the leaf with adequate support, then adjust hinges and hardware.
- Check the swing, locking action, and perimeter seal before completing the trim.
|
Use enough trained installers or lifting equipment for heavy assemblies. Do not rely on trim, sealant, or foam to support the door. |
| 7. Armored or Reinforced Security Door |
A reinforced door assembly that may include a steel structure, additional internal reinforcement, and decorative exterior panels. Terminology and construction vary by supplier. |
- Check the wall opening and verify the assembly's handing and fixing details.
- Move the frame into position using suitable lifting support.
- Wedge and align the frame, checking plumb, level, and square.
- Secure it with the specified anchors into sound structural material.
- Hang the leaf and adjust hinges, multipoint hardware, and strike locations as applicable.
- Operate the door through several full cycles and finish the perimeter joint.
|
Reinforcement does not replace correct anchoring to the surrounding structure. Follow the assembly-specific instructions, especially for heavy leaves and multipoint locks. |
| 8. Fire-Rated Steel Security Door |
A steel door assembly designed and tested for a stated fire-resistance performance. Fire performance applies to the complete compatible assembly, not just the door leaf. |
- Confirm the required rating and check that the leaf, frame, seals, hinges, closer, and hardware are compatible.
- Prepare an opening that meets the assembly's installation requirements.
- Set the frame plumb, level, and square using the approved fixing method.
- Install the specified anchors and any required fire-rated joint materials.
- Hang the leaf and fit or check the listed seals, closer, latch, and other required hardware.
- Verify self-closing and latching operation, clearances, and labels before handover.
|
Do not substitute unapproved seals, hardware, or infill materials. Follow the tested assembly instructions and applicable local fire-safety requirements. |
| 9. Security Grille Door or Gate |
A security grille or gate with an open-bar or mesh construction, sometimes installed in front of an entrance door or across an opening. |
- Measure the opening and identify a sound fixing surface for the frame or side tracks.
- Position the frame or tracks and check alignment with a level.
- Mark and drill fixing locations suitable for the wall or surrounding structure.
- Secure the frame or tracks with appropriate anchors.
- Fit the hinged or sliding gate and adjust its movement and locking points.
- Check that it opens fully, does not obstruct the main door, and locks securely.
|
Check clearance from the primary entrance door and any required escape route. Anchor selection depends on the substrate and gate design. |
| 10. Security Door with Smart-Lock Preparation |
A security door configured with a compatible smart lock or electronic access hardware. This is a hardware configuration and can be combined with several door materials. |
- Confirm the lock is compatible with the door thickness, backset, lock case, and existing preparation.
- Install and align the door frame using the fixing method specified for its construction.
- Hang the leaf and adjust it so the latch and lock components meet without force.
- Fit the smart lock according to its instructions, avoiding unauthorized cutting or drilling of the door.
- Set up batteries, access credentials, and any required network connection.
- Test mechanical operation, electronic locking, emergency access, and low-battery procedures.
|
Check door and lock compatibility before installation. Keep a working mechanical or manufacturer-provided emergency access method where the lock design supports one. |